
aeropress go instructions
- Published
- in Instructions
The AeroPress Go is a portable‚ compact coffee brewer designed for travel. It produces smooth‚ full-bodied coffee with ease‚ perfect for espresso-style or cold brew on the go.
What is AeroPress Go?
The AeroPress Go is a portable‚ compact coffee maker designed for travel and convenience. It combines the original AeroPress’s brewing technology with a travel-friendly design‚ fitting neatly into a mug for easy storage. Made from durable‚ food-safe materials‚ it’s lightweight and virtually unbreakable‚ making it ideal for on-the-go coffee lovers. The AeroPress Go allows users to brew smooth‚ full-bodied coffee in various styles‚ including espresso-style‚ Americano‚ and cold brew‚ without compromising on flavor. Its compact size and versatility make it a popular choice for coffee enthusiasts seeking high-quality brewing anywhere‚ anytime.
Key Features of AeroPress Go
The AeroPress Go features a compact‚ lightweight design that fits neatly into its included mug for easy transport. It uses a paper micro-filter to ensure smooth‚ grit-free coffee and air pressure to achieve rich‚ espresso-like flavors. Designed for travel‚ it’s durable and virtually unbreakable‚ making it perfect for outdoor use. The AeroPress Go supports multiple brewing methods‚ including standard‚ inverted‚ and cold brew. It’s compatible with all AeroPress accessories and includes a storage case‚ making it an ideal choice for coffee enthusiasts on the go who value convenience without sacrificing flavor quality.
Benefits of Using AeroPress Go
The AeroPress Go offers unparalleled portability‚ making it ideal for travel and outdoor use. Its compact design and included storage mug ensure easy transport without sacrificing brewing quality. The smooth‚ grit-free coffee it produces is free from bitterness‚ thanks to its paper micro-filter. The device’s durability and ease of cleaning make it a practical choice for daily use. Whether at home‚ in the office‚ or on the go‚ the AeroPress Go delivers consistent‚ rich flavors while accommodating various brewing methods‚ making it a versatile tool for coffee enthusiasts seeking convenience and quality in every cup.
Materials Needed for AeroPress Go
The AeroPress Go includes a compact brewer‚ a travel mug‚ and a set of micro-filters. Additional items like coffee beans‚ a grinder‚ and hot water are required for brewing.
Components of AeroPress Go
The AeroPress Go consists of a compact brewing chamber‚ a plunger with a rubber seal‚ a filter cap‚ and a set of paper micro-filters. It also includes a reusable plastic stirrer and a travel mug with a lid. The mug doubles as a storage container for the brewer when disassembled. The unit is lightweight‚ durable‚ and designed for portability‚ making it easy to carry while traveling. All parts are dishwasher-safe and BPA-free‚ ensuring safety and convenience for daily use. The design allows for quick assembly and disassembly‚ enhancing its practicality for on-the-go coffee enthusiasts.
Accessories for AeroPress Go
The AeroPress Go comes with a set of paper micro-filters‚ a reusable plastic stirrer‚ and a travel mug with a lid. Additional accessories include a filter cap‚ a storage case‚ and a tote bag for easy transport. The brewer is compatible with all AeroPress accessories‚ such as replacement filters and adapters. Optional extras like a coffee grinder or scale can enhance your brewing experience. The compact design allows all components to fit neatly into the travel mug‚ making it a self-contained brewing system ideal for travel or home use.
Recommended Coffee and Equipment
For optimal flavor with the AeroPress Go‚ use freshly roasted‚ medium to fine-ground coffee beans. Choose high-quality Arabica beans for a smoother taste. A burr grinder is ideal for consistent grinding. Use filtered water at 85-90°C for brewing. A digital scale can help measure precise coffee-to-water ratios. Pair the AeroPress Go with its accessories‚ such as the reusable filter or paper micro-filters‚ for convenience. Experiment with different roast levels and origins to tailor your brew. Proper equipment ensures a perfect balance of flavor and ease‚ making every cup enjoyable on the go or at home.
Setting Up AeroPress Go
Unbox and rinse the AeroPress Go‚ ensuring all parts are clean. Store the plunger in the AeroPress Go cup. Preheat by rinsing under hot water‚ then assemble for brewing.
Unboxing and Initial Setup
Unbox your AeroPress Go and rinse all components under fresh water. Store the silicone plunger end in the AeroPress Go cup for convenience. Preheat by rinsing the chamber and plunger with hot water to ensure optimal brewing temperature. Assemble the brewer by placing the filter cap on the chamber and positioning it over your mug or server. This initial setup prepares you for a smooth‚ full-bodied brewing experience. Make sure to handle the parts carefully to avoid any breakage. Now you’re ready to begin the brewing process!
Preparing the AeroPress Go for Brewing
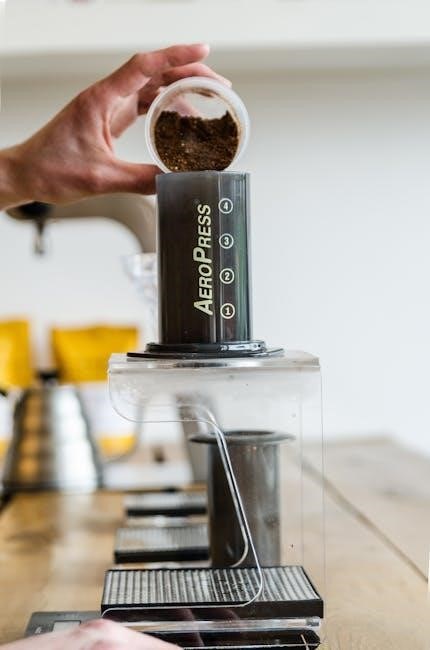
Insert the plunger into the AeroPress Go chamber‚ extending it just past the number 3 mark. Wet the filter cap and chamber with hot water to ensure proper sealing and optimal brewing conditions. Place the filter cap securely on the chamber and position it over your mug or server. Add 13-16 grams of finely ground coffee to the chamber‚ depending on your desired strength. Ensure the chamber is steady and the coffee grounds are evenly distributed; Hold the AeroPress Go firmly to avoid spills and prepare for a smooth brewing experience. This setup ensures a grit-free‚ full-bodied coffee every time.
Rinsing and Preheating the AeroPress
Begin by rinsing the AeroPress Go under fresh water‚ ensuring the silicone plunger and chamber are clean. Heat the AeroPress by rinsing it with hot water‚ then flush a filter in the filter cap. Place the filter cap on the chamber and let it drain briefly. This step removes any paper taste from the filter and preheats the AeroPress‚ ensuring optimal brewing conditions. Preheating helps maintain consistent water temperature‚ which is crucial for extracting the best flavor from your coffee grounds. This simple process guarantees a smooth‚ grit-free brewing experience every time.
Standard Brewing Method
Add 13-16g of finely ground coffee to the chamber‚ pour hot water (around 90°C) over the grounds‚ stir‚ and let steep for 1-2 minutes before pressing slowly for a smooth‚ full-bodied brew.
Step-by-Step Instructions
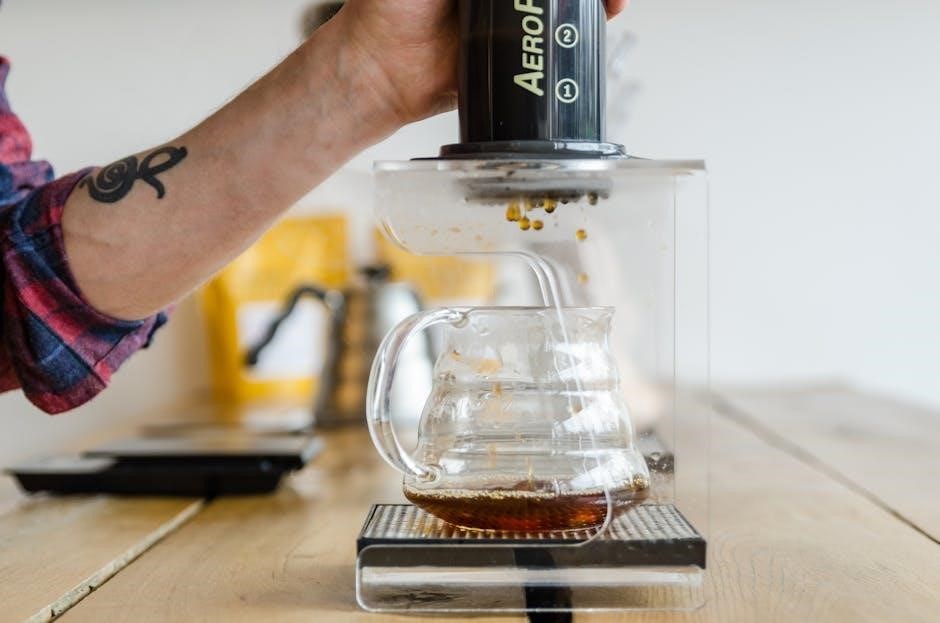
Insert the plunger into the AeroPress Go chamber‚ extending it just past the number 3 mark. Wet the filter and cap‚ then place them securely on the chamber. Add 13-16 grams of finely ground coffee. Pour hot water (around 90°C) over the grounds‚ ensuring saturation. Stir gently to ensure even extraction. Allow the coffee to steep for 1-2 minutes‚ depending on your desired strength. Press the plunger slowly and steadily to separate the grounds from the liquid. Pour the freshly brewed coffee into your cup and enjoy the smooth‚ full-bodied flavor.
Adding Coffee Grounds and Water
Begin by inserting the plunger into the AeroPress Go chamber‚ extending it just past the number 3 mark. Wet the filter and cap‚ then attach them to the chamber. Add 13-16 grams of finely ground coffee‚ depending on your preference. Pour hot water (around 90°C) over the grounds‚ ensuring all coffee is saturated. Stir gently for 5-10 seconds to promote even extraction. Allow the mixture to steep for 1-2 minutes before pressing. The water should fill the chamber to the recommended level‚ ensuring optimal flavor without overflow.
Plunger Insertion and Brewing Time
Insert the plunger into the chamber‚ stopping just past the number 3 mark. Allow the coffee to steep for 1-2 minutes‚ depending on your desired strength. Slowly press the plunger downward‚ applying gentle pressure to avoid bitterness. The total brewing time‚ including pressing‚ should be around 2-3 minutes. Ensure the plunger moves smoothly without excessive force‚ as this can cause the coffee to become over-extracted. The process should result in a smooth‚ full-bodied flavor with minimal effort. Avoid pressing too quickly‚ as it may lead to uneven extraction and a less enjoyable brew.

Inverted Brewing Method
The inverted method involves brewing with the AeroPress Go upside down‚ allowing coffee grounds to steep evenly. This technique enhances flavor extraction and prevents premature draining‚ resulting in a smoother‚ more balanced cup of coffee. It’s a popular alternative to the standard method‚ offering greater control over brewing parameters and minimizing waste. Many users find it easier to achieve consistent results with this approach‚ making it a favorite among AeroPress enthusiasts. Ideal for those seeking a richer‚ fuller-bodied coffee experience on the go.
How to Brew Upside Down
To brew upside down‚ place the AeroPress Go chamber upside down on a stable surface. Insert the plunger just past the number 3 mark to create a seal. Add finely ground coffee‚ then pour hot water over the grounds. Allow the mixture to steep for 1-2 minutes‚ stirring gently to ensure even extraction. Carefully press the plunger downward‚ maintaining control to avoid sudden pressure. This method prevents coffee grounds from settling and ensures a smooth‚ full-bodied flavor. Ideal for those who prefer a richer‚ more nuanced cup of coffee with minimal effort and cleanup.
Advantages of the Inverted Method
The inverted method offers a smoother‚ grit-free flavor by allowing coffee grounds to saturate evenly. It prevents the filter from clogging and reduces bitterness. This technique enables better control over brewing time and extraction‚ resulting in a richer‚ more full-bodied coffee. It also minimizes waste and makes cleanup easier. The inverted method is ideal for those who enjoy stronger coffee and want to experiment with various roast levels and grind sizes. Its portability and ease of use make it a favorite among travelers and coffee enthusiasts seeking consistent‚ high-quality brews on the go.
Common Mistakes to Avoid
One of the most common mistakes when using the AeroPress Go is overloading the chamber with too much coffee‚ which can lead to clogging and uneven extraction. Another error is using water that’s too hot‚ as it can burn the coffee and result in a bitter taste. Additionally‚ some users forget to rinse the filter beforehand‚ which can impart papery flavors. Incorrect grind size‚ either too fine or too coarse‚ can also affect the brew’s quality. Lastly‚ applying too little or too much pressure during the plunge can cause under-extraction or over-extraction‚ respectively. Awareness of these pitfalls ensures better results.
Cold Brew Brewing Method
The AeroPress Go excels at cold brew‚ with a steeping process that typically ranges from 12 to 24 hours‚ allowing for a smooth‚ low-acidity flavor. Use a higher coffee-to-water ratio for bolder results and adjust steeping time to suit your taste preferences. Perfect for hot summer days‚ it’s easy to prepare and serve over ice for a refreshing coffee experience. Experiment with different steeping durations and ratios to find your ideal cold brew profile.
Preparing Cold Brew with AeroPress Go
- Rinse the AeroPress Go filter with fresh water to ensure no paper taste remains.
- Add coarse or medium-coarse coffee grounds to the chamber‚ depending on your preference.
- Pour cold water over the grounds‚ ensuring all coffee is saturated.
- Stir gently to promote even extraction.
- Steep for 12 to 24 hours in the refrigerator for a smooth‚ low-acidity brew.
- After steeping‚ plunge slowly to separate the grounds from the liquid.
- Serve the cold brew over ice or mix with milk for a refreshing coffee drink.
Steeping Time and Ratios
For cold brew with AeroPress Go‚ steeping time typically ranges from 12 to 24 hours‚ depending on desired strength. Use a 1:4 coffee-to-water ratio for a balanced brew. Adjust the grind size to medium-coarse for optimal extraction. Steeping in the refrigerator helps prevent over-extraction and ensures a smooth flavor. Experiment with ratios and times to suit your taste preferences. For a stronger brew‚ reduce steeping time or increase coffee ratio. Always use filtered water to enhance flavor clarity and prevent bitterness.
Serving Cold Brew Coffee
Serve your AeroPress Go cold brew over ice for a refreshing drink. You can enjoy it black or customize with milk‚ sugar‚ or flavorings. For a creamier texture‚ mix with frothed milk or add a splash of water to adjust strength. Experiment with serving sizes to match your preference. Store leftover cold brew in the fridge for up to 24 hours in an airtight container. The AeroPress Go’s portability allows you to brew and serve cold coffee anywhere‚ making it ideal for travel or outdoor adventures. Chill before serving for the best flavor experience.
Espresso-Style Brewing Method
The AeroPress Go enables the creation of espresso-style coffee with rich‚ bold flavors. Using air pressure‚ it extracts a smooth‚ grit-free shot perfect for espresso lovers on the go.
Creating Espresso-Style Coffee
To create espresso-style coffee with the AeroPress Go‚ start by inserting the plunger just past the number 3 mark on the chamber. Wet the filter cap and add 13 grams of finely ground coffee. Tamp the grounds lightly for even extraction. Slowly pour hot water over the coffee‚ then stir gently. Press the plunger down with steady pressure to extract a rich‚ creamy shot. The result is a bold‚ espresso-style coffee with a smooth‚ grit-free texture‚ perfect for enjoying on its own or as the base for lattes and cappuccinos.
Grind Size and Tamping Tips
Use a fine to medium grind for espresso-style brewing with the AeroPress Go. Ensure the grind is consistent for even extraction. Lightly tamp the grounds to create an even surface‚ avoiding over-tamping‚ which can lead to clogged filters or bitterness. Proper tamping ensures balanced flavor and prevents channeling. For best results‚ use freshly ground coffee‚ as pre-ground coffee may lack optimal flavor. Adjust the grind size based on personal preference‚ but keep it fine enough to mimic traditional espresso. This step is crucial for achieving the rich‚ creamy texture characteristic of AeroPress espresso-style coffee.
Serving Suggestions
Your AeroPress Go espresso-style coffee can be enjoyed straight or customized to your taste. Add steamed milk for a latte or cappuccino‚ or enjoy it black for a bold‚ rich experience. For a refreshing twist‚ pour over ice and top with cold milk or water. Experiment with sweeteners like sugar‚ honey‚ or syrups for added flavor. The AeroPress Go’s versatility also allows you to use it as a base for coffee cocktails or layered drinks. Whether at home or on the go‚ this method ensures a delicious‚ professional-quality coffee experience every time‚ tailored to your preferences.
Customizing Your Brew
Adjust grind size‚ water temperature‚ and coffee-to-water ratios to tailor your AeroPress Go brew. Experiment with these variables to achieve your perfect balance of flavor and strength.
Adjusting Grind Size and Coarseness
Grind size significantly impacts AeroPress Go brewing. For espresso-style coffee‚ use a fine grind‚ while a medium grind suits standard brewing. Coarser grinds are ideal for cold brew. Experiment with burr grinders like the 1zpresso JX for precise control. Adjusting coarseness allows you to balance extraction and flavor; Fine grinds increase richness but risk over-extraction‚ while coarser grinds yield lighter‚ brighter notes. Use a consistent grind size to ensure even extraction. For optimal results‚ match your grind to your desired brewing method and flavor profile.
Varying Water Temperature
Water temperature plays a crucial role in AeroPress Go brewing. Ideal temperatures range between 85°C and 90°C for optimal extraction. Higher temperatures enhance bold flavors‚ while lower temperatures prevent bitterness. Use a thermometer to ensure accuracy. For espresso-style brews‚ slightly hotter water (around 90°C) is recommended. For cold brew‚ use room temperature or chilled water. Adjusting temperature allows you to tailor the flavor profile to your preference. Experiment with different temperatures to find your perfect balance. Consistent heating ensures even extraction and a smooth‚ satisfying cup every time;
Experimenting with Coffee-to-Water Ratios
Experimenting with coffee-to-water ratios is key to tailoring your AeroPress brew. Start with a standard ratio of 1:15 to 1:17 (coffee to water). For a stronger cup‚ use 1:12‚ while 1:18 yields a lighter brew. Adjust the ratio based on your coffee beans’ origin and roast level. Fine-tune to balance acidity and body. Consistency is vital‚ so measure accurately. Use a scale for precision. A higher coffee ratio intensifies flavor‚ while more water dilutes it. Find your perfect balance by tweaking the ratio gradually and tasting the results. This ensures a brew that suits your palate perfectly.

Troubleshooting Common Issues
Address common issues like clogged filters‚ sticking plungers‚ or spills. Rinse thoroughly‚ ensure smooth plunger alignment‚ and use stable surfaces to prevent mishaps during brewing.
Dealing with Clogged Filters
Clogged filters can disrupt the brewing process. To resolve this‚ rinse the filter under warm water after each use to remove coffee residue. If clogging persists‚ soak the filter in hot water for a few minutes before scrubbing gently with a soft sponge or brush. For stubborn blockages‚ mix a small amount of mild detergent with warm water and soak the filter overnight. Rinse thoroughly to ensure no soap residue remains. Regularly replacing the filter can also prevent clogs. Always store the filter in a dry place to avoid mold growth and ensure optimal performance.
Fixing Plunger Sticking Issues
If the plunger sticks‚ ensure it is thoroughly rinsed with fresh water after each use. Dry it completely to prevent residue buildup. For stubborn issues‚ soak the plunger in warm water for a few minutes before gently scrubbing with a soft sponge. Avoid using abrasive materials that could damage the silicone. Regularly lubricating the plunger with a small amount of food-safe oil can also prevent sticking. Always store the plunger in the AeroPress Go cup when not in use to maintain its shape and functionality. Proper care ensures smooth operation during brewing.
Preventing Breakage and Spills
To prevent breakage and spills‚ handle the AeroPress Go with care‚ as it is made of durable materials but still requires attention. Always place it on a stable‚ flat surface during use. Avoid dropping the device‚ as this could cause damage. Store the AeroPress Go in its included mug when not in use to protect it from accidental knocks; When brewing‚ ensure the chamber is securely positioned on the mug or server. Press the plunger gently and evenly to avoid sudden movements that might lead to spills. Regularly cleaning up any spills immediately can also prevent slips and further damage. These practices ensure the longevity and safety of your AeroPress Go.
Maintenance and Cleaning
Rinse the AeroPress Go under fresh water after each use to remove residue. Store it in the AeroPress Go cup to protect it from dust and damage‚ ensuring it remains clean and ready for the next brew.
Regular Cleaning of AeroPress Go
Regular cleaning is essential to maintain the AeroPress Go’s performance and hygiene. After each use‚ rinse the chamber‚ filter cap‚ and plunger under fresh water to remove any coffee residue. For deeper cleaning‚ use a mild soap and a soft sponge to scrub all parts‚ ensuring no buildup remains. Rinse thoroughly to eliminate any soap taste. Dry each component with a clean towel to prevent moisture buildup. Store the AeroPress Go in its cup to keep it dust-free and protected‚ ensuring it stays in excellent condition for future brews.
Drying and Storing AeroPress Go
Proper drying and storage are crucial for maintaining the AeroPress Go’s durability. After cleaning‚ thoroughly dry each component with a clean towel‚ paying attention to crevices where moisture might collect. Store the AeroPress Go in its included cup to protect it from dust and damage. Place the cup in a dry‚ cool location to prevent humidity from affecting the materials. Regular drying and storage help preserve the AeroPress Go’s performance and ensure it remains in excellent condition for future use. This simple maintenance routine extends the lifespan of your coffee brewer.
Replacing Filters and Accessories
To maintain optimal performance‚ replace AeroPress Go filters regularly. Use genuine AeroPress filters for consistent flavor and to prevent clogging. Accessories like the filter cap or plunger can be replaced if worn. Ensure all replacements are compatible with the AeroPress Go model. For convenience‚ filters and accessories are widely available online or in specialty coffee shops. Regular replacement prevents breakage and ensures smooth brewing. Always clean and store accessories properly to extend their lifespan and maintain your AeroPress Go’s functionality. This simple maintenance step keeps your brewer in peak condition for perfect coffee every time.
Advanced Brewing Tips
Explore different coffee roasts and origins for unique flavors. Adjust grind size and water temperature to refine your brew. Experiment with steeping times and ratios for customizable results‚ enhancing your coffee experience.
Using Different Roasts and Origins
Experimenting with various coffee roasts and origins can elevate your AeroPress Go experience. Lighter roasts highlight acidity and fruit notes‚ while darker roasts offer deeper‚ chocolatey flavors. Origins like Ethiopian coffee may bring floral hints‚ while Brazilian beans provide nutty undertones. By exploring these differences‚ you can tailor your brew to suit your taste preferences. Adjusting the grind size and brewing time can further enhance the unique characteristics of each roast and origin‚ allowing you to enjoy a wide range of flavors with your AeroPress Go.
Exploring Various Brewing Times
Brewing time significantly impacts the flavor profile of your AeroPress Go coffee. Shorter times (1-2 minutes) yield brighter‚ more acidic notes‚ while longer times (2-3 minutes) bring out deeper‚ sweeter flavors. Experiment within this range to find your ideal balance. Adjust the grind size to complement your chosen brewing time—finer grinds for shorter times and coarser for longer. Keep water temperature consistent (around 90°C) to ensure optimal extraction. This exploration allows you to tailor your brew to suit your taste preferences‚ whether you prefer a vibrant or rich coffee experience.
Enhancing Flavor with Stirring Techniques
Stirring plays a crucial role in achieving even extraction and balanced flavor with the AeroPress Go. After adding water to the coffee grounds‚ stir gently for 10-15 seconds to ensure all grounds are saturated. This helps prevent under-extraction and channeling. For inverted brewing‚ stir once before flipping for a smoother profile. Over-stirring can introduce air‚ leading to bitterness‚ so keep it light. Adjust your stirring technique based on the coarseness of the grind and brewing time to optimize flavor. Proper stirring enhances body and acidity‚ ensuring a more refined and enjoyable cup every time.
The AeroPress Go is a versatile‚ travel-friendly coffee brewer that delivers smooth‚ full-bodied flavor. Experiment with techniques and ratios to refine your perfect cup every time‚ anywhere.
The AeroPress Go is a portable‚ easy-to-use coffee maker ideal for travelers and coffee enthusiasts. It combines simplicity with versatility‚ allowing users to brew smooth‚ full-bodied coffee anywhere. The process involves rinsing the device‚ adding finely ground coffee‚ and steeping before pressing the plunger to extract the perfect cup. With its compact design and durability‚ the AeroPress Go supports multiple brewing methods‚ including standard‚ inverted‚ and cold brew. Whether you’re a beginner or an experienced brewer‚ the AeroPress Go offers a consistent and delicious coffee experience on the go.
Final Tips for Perfect Brewing
For a perfect brew‚ rinse the AeroPress Go thoroughly before use to eliminate any paper taste from the filter. Use freshly roasted‚ high-quality coffee beans and adjust the grind size according to your brewing method. Ensure water is at the optimal temperature (around 85°C) for extraction. Stir gently during brewing to evenly saturate the grounds‚ and monitor steeping times to avoid over-extraction. Clean and dry the AeroPress Go after each use to maintain its efficiency and longevity. Experiment with ratios and techniques to tailor your brew to your taste preferences.